click2cloud-page-loader

Tutorial-2-Linux Broker Deployment-Subscription-Manager Attach-RHEL Trial Subscription

26-Apr, 2016
click2cloud blogs- Tutorial-2-Linux Broker Deployment-Subscription-Manager Attach-RHEL Trial Subscription

Installing Red Hat OpenShift 2 Environment using Click2Cloud Inc.’s Auto Script – Tutorial Part 2 – Linux Broker Deployment

Linux Broker Deployment

Supported Operating System

OpenShift Enterprises is supported on; 64-bit versions of Red Hat Enterprise Linux (RHEL) 6.4 or higher.

It is not supported on Fedora, RHEL 7.x, or CentOS 7.x. A minimal installation of RHEL is recommended to avoid package incompatibilities with OpenShift. This deployment have used RHEL 6.6 x64 image on a 10 GB Droplet.

Various methods you can use for deploying OpenShift Enterprise, one of them is Click2Cloud OSEV2 Script:

  • The OSEv2sh utility, it interactively gathers information about a deployment before automating the installation of an OpenShift Enterprise host. This method is intended for trials as well as production environment.
  • In this deployment, we have used OSEv2sh utility.

Install Linux 6.6 OS and Register the Subscription by command

If you do not have redhat subscription, you can register for the trial subscription from here (For POC only) or contact Redhat Support.

Once you have the subscription account details, register the subscription on broker/node using below command.

  • # subscription-manager register –username <username> –password <password> –auto-attach
  • e.g.: # subscription-manager register –username demo –password demo123 –auto-attach

Check the available subscription with your account and get the pool id (copy this pool id it will require in further installation)


Register the Subscription by command

ATTACH THE POOL ID HAVING OSE SUBSCRIPTION


ATTACH THE POOL ID HAVING OSE SUBSCRIPTION

#subscription-manager attach –pool <your pool id>

e.g.: # subscription-manager attach –pool 3affb61f013b3ef6a5fe0b9a

INFRASTRUCTURE CHANNEL:

#subscription-manager repos –enable rhel-6-server-ose-2.2-infra-rpms

INFRASTRUCTURE CHANNEL


CONFIRM THAT YUM REPOLIST DISPLAYS THE ENABLED CHANNEL:

Linux Broker Deployment

Run the Installation Utility

1.    You will get the Installation script with your Click2Cloud OpenShift .NET development kit from here or you can download (install.sh & openshift.sh) installation utility directly using the below command:

install.sh

openshift.sh

2.     Execute the installation utility to interactively configure one or more hosts:

sh install.sh

3.    Follow the instructions provided below to deploy OpenShift Enterprise.

OpenShift Enterprises uses an interactive installation process. There are quite a few questions to answer, so pay attention! The questions are shown below, with the user input in red.

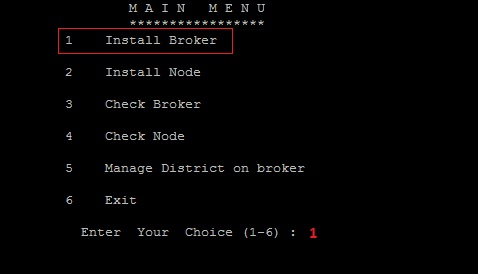
On the Main Menu you will see the multiple choices, which we will use one by one. So let’s start with installing broker.

  • Enter 1 to install broker:

start with installing broker

  • Press y if you have RHN Account, redhat subscription is required to configure OSE v2:

Installing Red Hat OpenShift Environment using Click2Cloud Auto Script - Linux Broker installation - Install broker _ Yes.jpg

  • Enter your subscription details – User ID, Password and Subscription Pool_Id:

Enter your subscription details

  • Press to enter password details for Mcollective, Mongodb and Openshift. If you select it will randomly generate the password:

randomly generate the password

  • Enter the DNS details here- Cloud domain name, Hosts domain name and Broker FQDN:

Hosts domain name and Broker FQDN

  • Enter Broker IP Address:

Broker IP Address

  • Select the default gear size for broker:

gear size for broker

  • Review the entered details before the installation starts. All the installation logs will store on sh.broker.log file in current directory. If you want to re-enter the details press else press y to proceed the installation:

current directory

Once the installation started, it will take an hour to complete the installation. Make sure you have full internet access on broker to get the required packages from internet.

Once it’s completed, it will return to the main menu.


  • Now check the broker is installed successfully and the services is running properly. Enter to check broker:

check broker

  • It will check all the required services and configuration files. If everything is up and running you will see the PASS message:

PASS message

Now you have successfully configured Broker in 10 steps.


To check the broker from console:

Please reset the demo user password to login from browser.

htpasswd /etc/openshift/htpasswd demo

New password: *****
Re-type new password: *****

Now open browser and enter the broker FQDN or IP address to login on broker console:

Once you login you will see the OpenShift console to create applications:

OpenShift console to create applications-Click2Cloud


For more details visit: Connect Click2Cloud:

• contact@click2cloud.net

• See Website

• Click2Cloud Videos

• Past Events

• Codefest 2021

• Click2Cloud Blogs

• Click2Cloud Twitter Account

• Click2Cloud LinkedIn Account

• Click2Cloud YouTube Channel


Recent Posts

subscription-manager attach rhel trial subscription red hat subscription manager subscription manager list match the system service levels register the system specific subscription attaching subscriptions attach options subscription manager remove red hat subscription subscription manager config command line red hat developer hat enterprise linux server