

Installing Red Hat OpenShift 2 Environment using Click2Cloud Inc.’s Auto Script – Tutorial Part 5 – Windows Node Deployment
For windows node deployment you will require OpenShift_Windows_Installer.exe setup, which you have got it with your Click2Cloud OpenShift .NET development kit.
OpenShift Winnode deployment Process is divided into two parts i.e.
A. Install Prerequisites
B. Install Windows Node
Once you have completed prerequisites software’s extraction process on windows node, you are ready to run the OpenShift_Windows_Installer.exe to install prerequisite software’s.
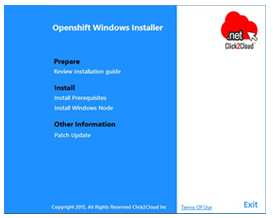
1. Double-click the executable exe file which is provided under Click2Cloud OpenShift .NET development kit to launch OpenShift Windows Installer.
3. Accept the License Agreement and Click
4. Following wizard shows the prerequisites installation progress along with the logs.
5. Click Finish to restart system after successfully installation Of Windows Prerequisites. It will automatically restart your computer.
***Note: – We need to run Install prerequisites twice Because of these following perquisites Software behavior.
Both the software’s require machine restart. Installer will work fine if you run Install prerequisites twice after rebooting the system, so it will install VS 2013 ISO shell on next prerequisite installation.
Once you have finished installing the prerequisites software’s on windows node, you are ready to run the Install Windows Node.
Again Double-click the executable OpenShift_Windows_Installer.exe file to launch OpenShift Windows Installer.
1. In order to install Windows node, Click on Install Windows Node It will open OpenShift Winnode Installer Wizard.
2. To configure the Openshift Windows Node, we have to provide OpenShift component parameters on above wizard. We have provided the required information and select the MS-SQL 2014 cartridge to deploy on windows node. It will provide .NET and MSSQL 2014 cartridge functionality.
All the Component parameters are explained below.
Public hostname of the windows machine (FQDN). For e.g. – winnode.openshift.example.com
Hostname of the OpenShift broker. For e.g. – broker.openshift.example.com
The applications domain name, where the applications will host. For e.g. – apps.example.com
Psk plugin used in Mcollective. The value for an Openshift Origin is ‘unset’.
For a default OpenShift Enterprise installation, the value should be ‘asimplething’.
You will get this Mcollective Information in client.cfg file from Linux Broker
Path – (/opt/rh/ruby193/root/etc/mcollective/client.cfg)
In below format
plugin.activemq.pool.1.port = 61613
plugin.activemq.pool.1.user = mcollective
plugin.activemq.pool.1.password =*********
ActiveMQ Username. The default ActiveMQ username for an OpenShift installation is ‘mcollective’
Mcollective port
ActiveMQ Port. The port is to use when connecting to ActiveMQ
ActiveMQ Password. The default ActiveMQ password for an ActiveMQ installation is ‘marionette’
If we check Ruby Checkbox, that allows the user to download and install Ruby.
If we check Cygwin Checkbox, that allows the user to download and install Cygwin.
By default it is disabled because it will installer by winnode prerequisites installer.
If we check Mcollective Checkbox, that allows the user to download and install Mcollective.
If we check Checks Checkbox, that allows the user to checking prerequisites.
If this uncheck, then it installs the Windows Node without SQL Server 2008 cartridge support.
Note that the mssql cartridge manifest must be manually update (C:openshiftcartridgesmssqlmetadatamanifest.yml).
If this uncheck, then it installs the Windows Node without SQL Server 2012 cartridge support.
Note that the mssql cartridge manifest must be manually update (C:openshiftcartridgesmssqlmetadatamanifest.yml).
If this uncheck, then it installs the Windows Node without SQL Server 2014 cartridge support.
Note that the mssql cartridge manifest must be manually updated
(C:openshiftcartridgesmssqlmetadatamanifest.yml).
3. After providing all component information correctly,You just click Install button to start OpenShift Winnode Installation.
Powershell prompt will open up and you will be able to see OpenShift Installation Process.
4. You will get Done message on powershell Prompt after successful installation of OpenShift Windows node.Click Enter to exit Powershell Prompt.
5. Now check the following directories for cartridges availability:
c:/OpenShift/cartridges
c:/OpenShift/.cartridge_repository
It will deploy dotnet, foxweb, mssql and windiy cartridges to your windows node.
Now go to broker and check the connectivity using the below command:
# oo-mco ping
You can see the windows node is available at broker.
You have successfully configured Windows Node.
Now create district on broker, add windows node to it and then import cartridges.
oo-admin-ctl-district –c create –o windows -n <Name Of Your District>
You will see the DotNet and other windows cartridges added successfully to your broker:
Now you are ready to create you first application using .NET cartridge.
From a client machine, use rhc tool to connect to your OpenShift cloud.
Click here to download rhc command line tool to your system.
Before creating your app, add the app’s hostname to your local hosts file, pointing to the Linux machine, so the git client and your browser know how to resolve that hostname.
All OpenShift applications that contain a Windows cartridge must be configured as scalable. When you use rhc to create a Windows application, make sure to specify the -s flag.
Example:
rhc create-app myapp dotnet -s
Add a MS SQL Server 2014 cartridge
rhc add-cartridge mssql-2014 -a myapp
You can get message and have successfully created app from rhc tool using windows DotNet and mssql 2014 cartridges.
Open browser and enter the broker FQDN or IP address to login to broker console:
Once you login you will see the OpenShift console to create applications, Click on Create your first application now:
It will create .NET application in couple of mins and you can see the application is created and its running gear. Also you can click on Add MSSQL Server 2014 cartridge to embed it with your .NET application:
Your SQL cartridge will be added successfully and it will show the DB information
TESTS
Below are the line-items that you can manually verify to test the deployment.